Showing posts with label ibrow media. Show all posts

Tuesday, 29 March 2011

The Events Page Carried On

In some ways the events section is one of the most important pages of the website, if not the most important as it is the section that will inform the audience of that is going on within the charity. It gives them the key information and quickly if they want to get involved. I have done this through the interactive map so that they know where it is and don't have to deal with a lot of information. It gets the audience involved in the website.

My next aim was to make the individual events stand out in a similar way to the information. I did this by redesigning the calender icon in photoshop so that the text stands out. I altered the CSS in dreamweaver to make the a block space for the image with a margin to separate the text.
See the .supporters for the CSS I added to it.
However the text wasn't clear enough so I made the red section of the calender bigger so the text was clear.
Code for calender image above
Here come the Modx bit. I created a template variable called {{list-events-tpl}} it sets teh date, tells the links to look for [~+id+~}, which means look for the div id with the styles and pick up the date [+date+]
Final result of icons highlighting the events

Attracting and keeping the audiences attention of the events page

My goal for the Events page was to create a format that would make it easy for the audience to know exactly when, where, who to contact and what website to visit quickly. So I have used icons along with a bold title to make the information eye catching. This means the audience doesn't have to spend ages searching for information or get bored of looking for it.

To add in the icons I had to create a div id for each, changing the name of the image, adding a class to position the icon and I referred it back to [*Eventphone*],[*Eventemail*]etc changing it for each icon so that it picks up the template variable that will style it in Modx. The * means that the template variable will refer to the page that I am now on.
The code above create the icons below
That I then styled into all of the defining icons. At first it was adding the email icon in the wrong place so I had to take out

Final result of specified event page

Sunday, 27 March 2011

Adding Up-dateable Content in Modx

I have constantly been in contact with the client about what content she wants in the website. She has provided me with a word document, containing all the information, photos etc that she wants included in the website. From there it is my job to ensure that I provide a easy to use, flowing way that she can update the content in the future. It also has to be in a way that fits the style of the website.
Again I have followed the structure of the previous pages of adding content (within Modx). The client adds the content into title, long title, intro text and then the main content area. Modx styles it according to which area it is put into e.g. the title and intro text will be in a bold, dark blue text and the main content will be in a normal, black text.

I have learnt that it is important to but the text into the document with the insert icon within the Modx interface. If I just copied and pasted it into the general text area in Modx it tends to add code into it from word. However by doing this it doesn't completely get rid of unwanted code it has added breaks instead of paragraphs

at time which I have had to go through and alter in the 'edit HTML' section.
Another really good thing about Modx is that you can alter the content/layout of the website in the front end. I have experimented adding pictures through the front end (only work in the browser you have logged into Modx with).


First you go to the quick edit section, manage picture and choose the files that you want to upload then press the upload button. It then accesses the gallery code that I have created to format the photos.
Final look of the photos.
To create the gallery I have 'nicked' the code from the images that I have on the homepage (3 pictures that can be up date able) however again I have altered the code to adjust the size and position of the photos. As you can see from the screen shot of the code below I have changed the height from 500 to 250 and changed where it links to

The Donate Button

The donate button is a big part of how When You Wish Upon A Star will gain funds. It is an eye catching illustrated graphic that I hand drew and altered in photoshop (using my graphics tablet).

After sizing it in photoshop and creating the space for it (going by the chosen mock-up) within the website using CSS I created a div in Modx. This is the basic code that that any template variables or ditto calls will relate back to. Because it is just a click able image no ditto calls are needed just a link to the donate now page that will give the audience plenty of simple options to donate. By having two options to donate (a button image or text within the navigation it will attract more people). It adds extra functionality and user ability by having two options as different people may respond better to images or text.

After creating the div id in modx I copied the source code back into dreamweaver so that I could work with the CSS.

The supporters page: Modx style

My next task was to set up the 'Our Supporters' page so that the client can easily in put new content. This is one of the pages that needs to be constantly up date able.

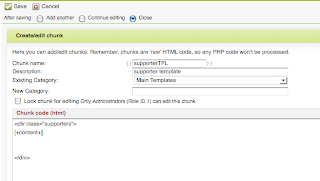
This is the main template that I created that will be refereed to in the main document so that I don't have to duplicate code. It will also refer back to this code.
For the template to work I had to use a ditto call. A ditto call is a templating command that lists data from documents to create content in many different formats. Through using a ditto call I have been able to specify what data/layout that the data is presented in.

In teh code below I have changed it so that the content is presented in the order that it is edited on &sortBy`editedon`. Also I have changed &tpl=`testimTpl` to refer to the supporters page template &tpl=`testimTpl` to &tpl=`supporterTpl`. This will get all the correct data that I have specified in the supporters page template.


I started by creating a new template called supportersTpl. One of my aims throughout teh website is to keep the text of the website in a simpler format so I have always included text in the Long title, Description (so that the client gets extra guidance of what to write in that section), Documents alias (helps to locate it in the left hand side bar), Summary (intro text)-When You Wish Upon A Star can enter text in here to keep up with the format of the other pages, Menu index-places it within the navigation in a suitable place, Uses template- MainTemplate refers to the styling of the other pages that are under that template so that I don't have to keep duplicating code.
The only other alteration I had to make to this template to make it fully functional was to make it refer to the right page within the ditto call. I changed what parent page that the ditto call refers to on the left hand side e.g. &parents=`206`. This just tell that template to go to the main supporters page that happens to be referenced as 206. At first it didn't work because I had typed in supportersTpl instead of the proper template name that is supporterTpl. This just goes to show that adding one letter can through the code off course. As I have always known you have to be VERY precise in the code used.
Whilst creating these templates I have realised how much using a content management system benefits the user and myself as a website designer as the content can be altered through one ditto call/chunk/template instead of having to keep altering everything in dreamweaver that within a second can change the whole website. Most of all for this project it has helped me learn about what system is used in the industry and how this benefit the client. I am glad that I have learnt more about content management systems as I feel it has made my work more professional. As I have had to learn so much about content management systems in such a sort amount of time I have had to reconsider what my priorities are to learn. HTML 5 and CSS3 have taken a back seat in terms of learning new skills but intend to experiment with them a bit but not include them in the website as the client needs the content management system to be working and look at its best before I delve into that new technology.

The search box

For the search bar I altered some ajax code that I put into a chunk labeled {{search}}. &addjscript='0' means that no I don't want javascript to be applied to this section and showResults=`0` means that no I don't want the results to be shown. 0=yes 1=no within the code.
The only problem is that the search bar appeared as below so I had to apply some CSS to style how I wanted it to look.
This is the CSS that I used to style the search box.

The most important elements out of this section is the image that provides the background for the search bar. Also I made the font height 100%, which applies to the line height being used to its maximum.
Overflow set to hidden to prevent overlapping of text typed into the box overlapping the search bar. overflow:hidden;
This part is used to style the label 'search' so that everyone knows what it is.
This is to style the text that goes into the search bar.


Adjusting/creating Modx elements

Throughout the screen shots below I was creating details that are going to be displayed on the right hand side of the page to give the audience specific details of when,where, cost, contact details and the venue of an event so that it is easy to find and in a structured format.

1) First of all I had to create a chunk. A chunks purpose is to refer to code so you don't have to duplicate code. Below I had to alter which part the code is referring to within the chunk e.g. [*Eventcost*]
[*Eventvenue*]
[*Eventemail*]

The * means that it will refer the code to the page that you are now on.
2) That print the text on the page but I still had to alter the CSS to change the colour of the code, which was easy to do.
3) I changed the CSS in dreamweaver
4) And uploaded the CSS style sheet (this is the general method of uploading the CSS I go through each time that a style change is made and the back end is dealt with in Modx).
5) Final result of bold, dark blue text that defines the major details of each events. The client can go into Modx and adjust the details.
Although this was a simple task compared to other tasks I have done in Modx I think that is an important component because it is forming a structure for each page that the audience will find simple to use as they will immediately get used to the structure. This will make the website easy to use because of the flowing nature of the site. Where ever you are on the site you will be able to navigate to where you want by the main navigation, the footer navigation, the search bar and on each page on the right is has elements that relate to the topic you are on so the information you need is easy to find.

Sunday, 20 March 2011

Creating a News Ticker Through Modx

To get to grips with Modz and how it works in a website design agency I have had a series of meetings with Chris Fickling (one of the partners at ibrow media). He is the website design/developer of the previous website. he has been showing me the ropes of how to use Modx so that the client can use the update able content to its ultimate level.

To create a news ticker I had to set the layout of it in dreamweaver first so that I could assign Template Variables to it (tv's).

In this screen shot I had to add a Template variable to a template so that the document could access it and implement it on the web page. I called this Template variable 'newsoptions' so that the client will know what it is and be able to change the settings for the news that she wants to be shown.

This screen shot shows me defining the options that the client will be able to choose from (yes or no). The code for that is yes==yes||no==no

|| is telling the code to show the next radio option on the next line. A radio option just means that a few options are chosen and only one can be chosen.
The next step was to set the options for what images will be set up in the news ticker and where the images will be brought from.

The next step was to set the chunks, which is raw HMTL code that tells that template variables what to do and what div to access whilst carrying out its function.

Tuesday, 1 March 2011

What the client really wants and how to find out

Recently I have been talking to Chris Fickling, of ibrow media. Whilst dealing with the client I have learnt a lot of new skills that have helped me to demonstrate the role and responsibilities that a multimedia practitioner should provide. For instance Chris recommended that every-time I have a new client, providing them with a questionnaire that covers the area that the clients needs changing/developing of the website. It will also be solid evidence of cost and a reference point of which to go back to if the client looses sight of what they want. I have re-designed the questionnaire so that the client can focus on areas that they may not have covered previously.

Basic information
  • Who is the key client of the business organisation?
  • Name
  • Title
  • Contact details
Who has the final say of the product?
When is the product needed by?
What may effect the schedule? (e.g. meetings, marketing, reports).
Budget?

Current website
What are the main features you need changing?
What areas are successful? Why?
What aspects of branding, feel of the website needs to be kept?

Reasons for redesign
What are the main reasons that you need the website redesigned for? e.g. outdated website, re-branding etc
What are the main purposes of the website redesign? donations, increased sales, advertisement
What do you want to be achieved in the long and short term of the website?
How will the new redesigned websites success be managed? Questionnaire, google analytics
How do you intend to achieve your business strategy both online and off line?

Audience
Who are you aiming for? Age, job, income, what do they use for the web for?
What is the main action the audience will engage with on your website?
What are the main reasons you stand out from the competition and people choose your website over others?

The impression
Use a few adjectives to describe how you wan the visitor to feel when they are on your website. e.g. friendly, business orientated, professional, cutting edge
How does your website/business stand out against the competition?
Example of URL that you admire

Content
Is there any part of the website that you want to transfer into the new one?
How do you want the functionality and navigation be altered?

Tech
Do you need a content management system to create update able content?
Do you need more defined programming, such as photo galleries, news updates, news letters etc?

All of these questions aim to get a solid idea of what the client NEEDS


Sunday, 20 February 2011

Feedback...


On feedback from ibrow media (wish upon a stars current web developer) I have made a few alterations so that the website can be up-dateable easily by Wish upon a star.
  1. Made the banner smaller so there more room for content
  2. made the balloon smaller so more room for animation
  3. added a plane with a banner so there's more space for navigation to advertise links when needed.
  4. Only put one picture in the banner so that it doesn't have a 'wide screen' affect. Taken away the blue so it doesn't separate the information from the picture.
I intend to draw my own plane and banner to make it fit in with the rest of the design but for the moment I have placed this image in to see what the clients response is in order to save time.